「Autumn」カテゴリーアーカイブ

Chestnut – Sumi-e

Hello,chestnut is here.

栗_Chestnut


Tips :

Burr body

Load very bright ink with more water than usual.
Burr body consists of three parts.

(Wash brush)

Fruits

Load black ink
To get pointed of the fruit, tap on the paper with the tip of brush hair first.
Then, lean the brush bar to depict the bottom of the fruit body.
Don’t pull the brush. Hold the same position.
Use the brush like stamp.

Burr

Make a brush for thin line drawing
Put the hair of brush on the ink stone to get very black ink on one side
Then, draw burr.
Put the top of the brush hair on the burr part depicted earlier.
Then move off to outside of burr body.
By starting to draw the burr line from the body, the ink is fading with taking up the water.

(Wash brush)

Leaves

Make up a brush for normal stroke. Load regular black ink
First, tap the brush tip on the paper.
Then push and pull the brush vertically along with moving
Keep the brush vertically toward the paper.

(Wash brush)

Load bright black ink
Then do the same movement as earlier.
You can get shade.

Enjoy 🙂


Grape – Sumi-e

(C) Kazu Shimura 2006

The Autumn, the season of fertility.
Grape is one of fun motif for sumi-e. Because it needs few techniques to depict and you can experience what sumi-e is.

Tips:  

Grapes:

Load black ink.
Two strokes for one grape.
First touch down the paper with the top of the brush hair then swirl the brush.
Second stroke moves little along with the first part.
Continue the same two-strokes movement to add other grapes until the ink is consumed totally.
A Grape which is depicted first comes front and second one goes back. (This is one of great characteristics of sumi ink I love)

Leaf

Make a brush as normal.
Hold a brush horizontally and keep it almost parallel at paper surface.
Touch down with the all brush hairs at once.
Slide the brush.
The grape leaves look like kind of sharply.

(Wash the brush)

Veins

Make a brush for thin line drawing.
Load very black ink.
Draw the line.

Brunch and connect each grape

Draw brunch
Connecting each grape with thin line is the most fun part of the grape drawing.

Enjoy 🙂

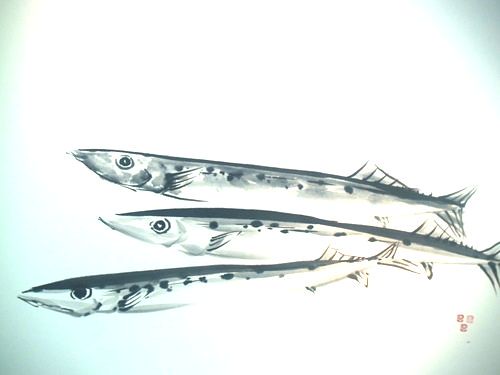
Saury Fish – Sumi-e

Saury, san-ma in Japanese, is one of Japanese favorite fish in autumn for dinner. It has a strong thin body and silver and blue colored. It is like sharpened swards. San-ma is depicted by three Chinese characters which means Autumn, sward, fish.

水墨画 秋刀魚 "Sanma"

Tips :

Eye and face :

Draw the eye first.
Make a brush for thin line drawing.
Then, draw the outline.

Back top :

Put the very black ink into the brush.
Then, draw a big and strong line from the point above the eye to the tail.
This line is the very important part of the saury drawing.

Fin :

Again, prepare your brush for the thin line drawing.
Add tail fin and other fin.

Back :

Put “no ink” into the brush. Your brush has only water here.
Then, hold the brush horizontally.
Lower the brush into the black line drew before.
Bring down the brush with keeping your brush horizontally.
Keep your brush position and bring it down.
So that you can get bleeding effect.

Dots.

Make your brush for the thin line drawing.
Put the very black ink in the brush.
Then, just put down the brush on paper in order to stump the ink.

Chrysanthemum Sumi-e

Chrysanthemum - 菊 -

Chrysanthemum, wow we call it ‘Kiku’. Too long word to remember in English 🙂

Anyway, the chrysanthemum recalls me of the funeral. At the funeral, the photo of the dead is displayed surrounded with lots of small yellow chrysanthemum.

The word for ‘kiiku’, chrysanthemum in Japan, was used for the name(both boys and girls ) until seventy or eighty year’s ago(the grand father age). There is a Kitano’s film called ‘KIKU-jiro no Natsu’, the summer of KIKU-jiro. Jiro is often used for the second sun’s name.

So, what I want to say here, the chrysanthemum is not pop or cute flower which you might not choose ones for the girlfriend’s birthday gift.

 Tips:

1. Petal :

  • Light ink with small squared the tip  of the hair of the brush(fude-saki). You squeeze fudesaki after dipping the ink.
  • The squared fudesaki depict the round tip of the petal.
  • Draw the center part of the flower. This part of the flower still like a bud, so the drawing stroke must be  short and hard touch. It has little curving and sweeping at the last part of stroke.
  • You take a half breath at the first touch of fudesaki on the paper. That moment gives the round shape of the petal tip and more importantly the blacker color of the tip.
  • Eight strokes for the center part.

2. Surrounding petals :

  • Petals around the center are longer and winding.
  • The shape of fudesaki is the same as well.
  • Every stroke must be toward the center. Think the real petals are connected at the center and each petal grow from the one point.

3. Leaves :

  • Almost the same as asagao leaves drawing.
  • One leaf is depicted by eight strokes. Top left, middle left, the bottom, the middle right, then top right.  Two for each small part of leaves.
  • The bottom part ; You bring the body of the brush (jiku) down toward yourself at the last move of the stroke. At that time,  the body part of fude hair must touch on the paper. You pull fude up, then the round shape will show up. That is the tip of the leaf. Use fude as a stamp.
  • Wash fude.
  • Bend the fude hair on the cloth.
  • Put the very black ink on the ink stone on the behind of the bent fuse hair.
  • Then, draw the thin vein line on the leaf.
  • The line won’t show up until the ink becomes dry.
  • Draw lighter black leaves behind very black one.  Remember, draw black one first.

Stems:

  • Wash fude and bend the fude hair on the cloth.
  • Put the very black ink on the ink stone.
  • Draw stem lines. 

Enjoy 🙂

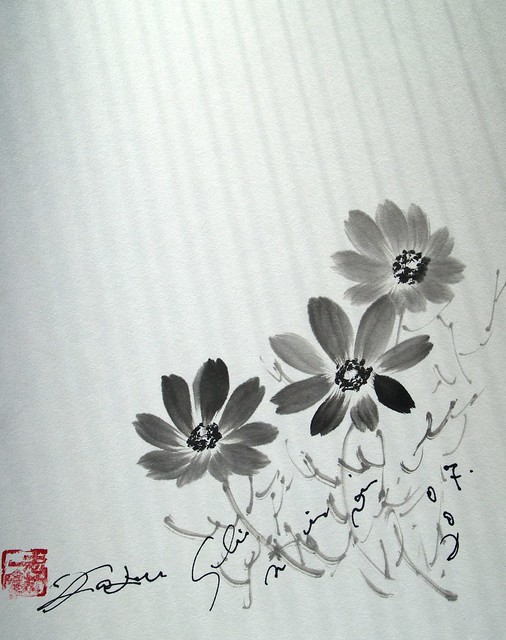
Cosmos Sumi-e Drawing

Cosmos 秋桜

Some might think cosmoses are pretty slightly flower because we see them dancing in the Autumn wind.

But if you see carefully, you notice cosmos has thick petal. So, when you draw cosmos, you have to have heavy touch on petal part, and soft and thin touch on the stem.

Tips :

1. Petal

  • Heavy black ink.
  • Fork the tip of the hair so that you can depict the divided top of the cosmos petal. To folk it, squeeze, or press only the tip after putting the ink.You can give two strokes for one petal.
  • Shape the tip square. (Remember, you always must have good shape of the brush hair before starting to draw)
  • Drawing direction : Top to the center. Use only the tip part of the hair. You start to draw at the very light touch and keep lightly while moving.
  • At the end of stroke, you pull the brush up little to express the petal end edge shape, which is the connection part with each petal and stamen(the body of the flower).
  • Eight petals in one set. Top two petals first, then the both side of the top and the bottom. The length of the bottom petals are shorter than the top ones. You can accent the length depend on which side the flower face turns in.
  • The flower face direction is important to give your drawing the sense of the flow.
  • Don’t refill ink during the petal drawing. One supply for one set of the flower. You can get good gradation in the one set of the flower.

2. Stamen

  • Need the very black ink. Bend the brush hair. The same shape as the line drawing.
  • Then, just point on the paper, making circle.

3. Stem and leaves

  • Light black ink. Bending hair shape.
  • Both the stem and leaves of the cosmos are so slim.
  • You don’t need to be careful about stem and leaves.

Enjoy 🙂